MaskHS: Difference between revisions
From Avisynth wiki
Jump to navigationJump to search
Raffriff42 (talk | contribs) m formatting |
mNo edit summary |
||
| (7 intermediate revisions by 3 users not shown) | |||
| Line 1: | Line 1: | ||
<div style="max-width:82em; min-width:42em;" > | |||
<div {{BlueBox2|40|0|3px solid purple}} > | |||
{{AvsPlusFullname}}<br> | |||
Up-to-date documentation: [https://avisynthplus.readthedocs.io/en/latest/avisynthdoc/corefilters/maskhs.html https://avisynthplus.readthedocs.io] | |||
</div> | |||
Returns a mask (as [[Y8]]) of clip using a given hue and saturation range. Added in v2.6. | |||
== Syntax and Parameters == | == Syntax and Parameters == | ||
| Line 5: | Line 14: | ||
{{FuncDef | {{FuncDef | ||
|MaskHS(clip [, int ''startHue'', int ''endHue'', int ''maxSat'', int ''minSat'', bool ''coring'' ] ) | |MaskHS(clip [, int ''startHue'', int ''endHue'', int ''maxSat'', int ''minSat'', bool ''coring'' ] ) | ||
}} | |||
{{FuncDef | |||
|MaskHS(clip [, int ''startHue'', int ''endHue'', int ''maxSat'', int ''minSat'', bool ''coring'', | |||
bool ''realcalc'' ] ) {{AvsPluscon}} | |||
}} | }} | ||
| Line 13: | Line 27: | ||
::If {{FuncArg|endHue}}<{{FuncArg|startHue}} then the range [{{FuncArg|endHue}}, 360] and [0, {{FuncArg|startHue}}] will be selected (thus anti-clockwise). If you need to select a range of [350, 370] for example, you need to specify {{FuncArg|startHue}}=370, {{FuncArg|endHue}}=350. | ::If {{FuncArg|endHue}}<{{FuncArg|startHue}} then the range [{{FuncArg|endHue}}, 360] and [0, {{FuncArg|startHue}}] will be selected (thus anti-clockwise). If you need to select a range of [350, 370] for example, you need to specify {{FuncArg|startHue}}=370, {{FuncArg|endHue}}=350. | ||
::Range 0 to 360 (degrees), default 0, 360; thus when using the default values all pixels will be processed. | ::Range 0 to 360 (degrees), default 0, 360; thus when using the default values, all pixels will be processed. | ||
:: | ::The following shows some arbitrary {{FuncArg|startHue}} and {{FuncArg|endHue}} values for the basic colors, with a [[Histogram#Color2_mode|Histogram vectorscope]] to illustrate the color circle: | ||
::{| class="wikitable" border="1" style="text-align:center" | ::{| class="wikitable" border="1" style="text-align:center" | ||
|style="width:6em" | '''Color''' | |||
|style="width:6em" | '''startHue''' | |||
|style="width:6em" | (center) | |||
|style="width:6em" | '''endHue''' | |||
|rowspan="7"| [[File:Labeled-vector-color2.png|right]] | |||
|- | |- | ||
|style="text-align:left" | Red | |style="text-align:left" | Red | ||
|style="background:#D926B9; color: #EEEEEE" | 075 | |style="background:#D926B9; color: #EEEEEE" | 075 | ||
|style="background:#D90000; color: #EEEEEE" | 102 | |||
|style="background:#D93B26; color: #EEEEEE" | 115 | |style="background:#D93B26; color: #EEEEEE" | 115 | ||
|- | |- | ||
|style="text-align:left" | Yellow | |style="text-align:left" | Yellow | ||
|style="background:#D99D26; color: #121212" | 150 | |style="background:#D99D26; color: #121212" | 150 | ||
|style="background:#D5D926; color: #121212" | | |style="background:#D9D900; color: #121212" | 176 | ||
|style="background:#D5D926; color: #121212" | 180 | |||
|- | |- | ||
|style="text-align:left" | Green | |style="text-align:left" | Green | ||
|style="background:#9DD926; color: #121212" | 191 | |style="background:#9DD926; color: #121212" | 191 | ||
|style="background:#00D900; color: #121212" | 230 | |||
|style="background:#26D97A; color: #121212" | 258 | |style="background:#26D97A; color: #121212" | 258 | ||
|- | |- | ||
|style="text-align:left" | Cyan | |style="text-align:left" | Cyan | ||
|style="background:#26D9B9; color: # | |style="background:#26D9B9; color: #121212" | 279 | ||
|style="background:#26B2D9; color: # | |style="background:#00D9D9; color: #121212" | 282 | ||
|style="background:#26B2D9; color: #121212" | 300 | |||
|- | |- | ||
|style="text-align:left" | Blue | |style="text-align:left" | Blue | ||
|style="background:#2688D9; color: #EEEEEE" | 316 | |style="background:#2688D9; color: #EEEEEE" | 316 | ||
|style="background:#0000D9; color: #EEEEEE" | 000 | |||
|style="background:#5026D9; color: #EEEEEE" | 004 | |style="background:#5026D9; color: #EEEEEE" | 004 | ||
|- | |- | ||
|style="text-align:left" | Magenta | |style="text-align:left" | Magenta | ||
|style="background:#9626D9; color: #EEEEEE" | 028 | |style="background:#9626D9; color: #EEEEEE" | 028 | ||
|style="background:#D900D9; color: #EEEEEE" | 048 | |||
|style="background:#D526D5; color: #EEEEEE" | 052 | |style="background:#D526D5; color: #EEEEEE" | 052 | ||
|} | |} | ||
| Line 51: | Line 73: | ||
::Practically the saturation of a pixel will be in the range [0,100] (thus 0-100%), since these correspond to valid RGB pixels (100% corresponds to R=255, G=B=0, which has a saturation of 119). An overshoot (up to 150%) is allowed for non-valid RGB pixels (150% corresponds to U=V=255, which has a saturation of sqrt(127<sup>2</sup>+127<sup>2</sup>) = 180). | ::Practically the saturation of a pixel will be in the range [0,100] (thus 0-100%), since these correspond to valid RGB pixels (100% corresponds to R=255, G=B=0, which has a saturation of 119). An overshoot (up to 150%) is allowed for non-valid RGB pixels (150% corresponds to U=V=255, which has a saturation of sqrt(127<sup>2</sup>+127<sup>2</sup>) = 180). | ||
::{{AvsPluscon}} [[TODO]] needs documentation of behavior with {{Deep_color}} formats. | |||
::Range 0 to 150 (percent), default 150, 0; thus when using the default values all pixels will be processed. | ::Range 0 to 150 (percent), default 150, 0; thus when using the default values all pixels will be processed. | ||
:{{Par2|coring|bool|true}} | :{{Par2|coring|bool|true}} | ||
::When set to true, the luma (Y) is clipped to | ::When set to true, the luma (Y) is clipped to TV-range; when set to false, the luma is left untouched. | ||
{{HiddenAnchor|realcalc}} | |||
:{{Par2|realcalc|bool|false}} | |||
::{{AvsPluscon}} When true, force 'no-lookup': pure float calculation of new pixel values (always true for certain {{Deep_color}} formats) ([[TODO]] - clarify) | |||
</div> | </div> | ||
| Line 75: | Line 102: | ||
:Start with a wide hue range and narrow it until the output of '''MaskHS''' isolates the range of interest. You can also use [[Tweak]] to preview the affected range (with ''sat''=0), as the arguments are compatible. | :Start with a wide hue range and narrow it until the output of '''MaskHS''' isolates the range of interest. You can also use [[Tweak]] to preview the affected range (with ''sat''=0), as the arguments are compatible. | ||
:In our example we | :In our example we end at {{FuncArg|startHue}}=105, {{FuncArg|endHue}}=138, and the following mask is obtained: | ||
:{|border=0 | :{|border=0 | ||
|<pre style="width:22em" > | |<pre style="width:22em" > | ||
| Line 99: | Line 126: | ||
</div> | </div> | ||
</div> | </div> | ||
== Changelog == | == Changelog == | ||
| Line 107: | Line 133: | ||
| Initial Release | | Initial Release | ||
|} | |} | ||
</div> | |||
[[Category:Internal_filters]] | [[Category:Internal_filters]] | ||
[[Category:Masking]] | [[Category:Masking]] | ||
Latest revision as of 07:23, 18 September 2022
AviSynth+
Up-to-date documentation: https://avisynthplus.readthedocs.io
Returns a mask (as Y8) of clip using a given hue and saturation range. Added in v2.6.
Syntax and Parameters
MaskHS(clip [, int startHue, int endHue, int maxSat, int minSat, bool coring ] )
MaskHS(clip [, int startHue, int endHue, int maxSat, int minSat, bool coring, bool realcalc ] ) AVS+
- int startHue = 0
- int endHue = 360
- The resulting mask will contain source values in the range [startHue, endHue] when startHue<endHue. Note that the hue is periodic, thus a hue of 360 degrees corresponds with a hue of zero degrees.
- If endHue<startHue then the range [endHue, 360] and [0, startHue] will be selected (thus anti-clockwise). If you need to select a range of [350, 370] for example, you need to specify startHue=370, endHue=350.
- Range 0 to 360 (degrees), default 0, 360; thus when using the default values, all pixels will be processed.
- The following shows some arbitrary startHue and endHue values for the basic colors, with a Histogram vectorscope to illustrate the color circle:
Color startHue (center) endHue 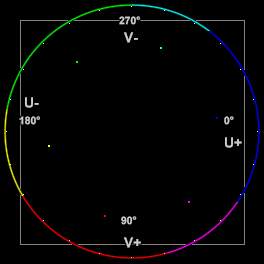
Red 075 102 115 Yellow 150 176 180 Green 191 230 258 Cyan 279 282 300 Blue 316 000 004 Magenta 028 048 052

- int maxSat = 150
- int minSat = 0
- The resulting mask will contain source values in the range [minSat, maxSat].
- Practically the saturation of a pixel will be in the range [0,100] (thus 0-100%), since these correspond to valid RGB pixels (100% corresponds to R=255, G=B=0, which has a saturation of 119). An overshoot (up to 150%) is allowed for non-valid RGB pixels (150% corresponds to U=V=255, which has a saturation of sqrt(1272+1272) = 180).
- AVS+ TODO needs documentation of behavior with Deep Color formats.
- Range 0 to 150 (percent), default 150, 0; thus when using the default values all pixels will be processed.
- bool coring = true
- When set to true, the luma (Y) is clipped to TV-range; when set to false, the luma is left untouched.
- bool realcalc = false
- AVS+ When true, force 'no-lookup': pure float calculation of new pixel values (always true for certain Deep Color formats) (TODO - clarify)
Examples
- Suppose we want to create a mask of the skin of the girl below. The proper way to do this is to look at the vectorscope of Histogram:
clip = ...
Histogram(clip, mode="color2")
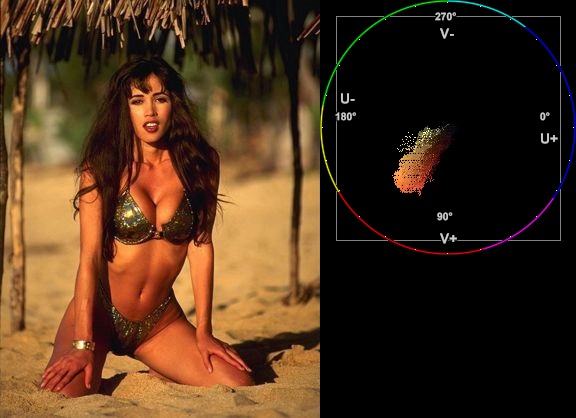

- and estimate the hue range you want to select. As can be seen, the orange hue is between (about) 105 and 165 degrees.
- Note: axis labels have been added to the vectorscope as a guide – they are not generated by the above script
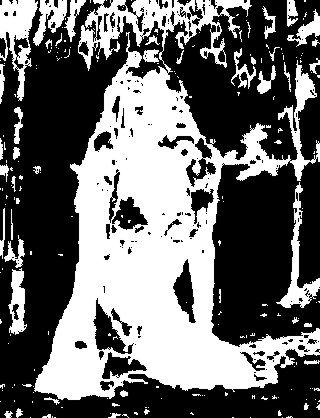
- Start with a wide hue range and narrow it until the output of MaskHS isolates the range of interest. You can also use Tweak to preview the affected range (with sat=0), as the arguments are compatible.
- In our example we end at startHue=105, endHue=138, and the following mask is obtained:
clip = ...
MaskHS(startHue=105, endHue=138)

- Looking at the blue screen example in Overlay the following can be used
testcard = ColorBars

# example subtitle file with blue background:
subs = ImageSource("F:\TestClips\blue.jpg").ConvertToYV24

# subs.Histogram(mode="color2").ConvertToRGB # blue in [345,359]
mask_hs = subs.MaskHS(startHue=340, endHue=359).Levels(0, 1, 255, 255, 0)

Overlay(testcard, subs, mask=mask_hs, mode="blend", opacity=1)
Changelog
| v2.60 | Initial Release |
