MaskHS
From Avisynth wiki
(Difference between revisions)
Raffriff42 (Talk | contribs) m (added category) |
Raffriff42 (Talk | contribs) (formatting, links, phrasing) |
||
| Line 1: | Line 1: | ||
| − | + | Added in v2.6. Returns a mask (as [[Y8]]) of clip using a given hue and saturation range. | |
| − | + | == Syntax and Parameters == | |
| + | {{FuncDef | ||
| + | |MaskHS(clip [, int ''startHue'', int ''endHue'', int ''maxSat'', int ''minSat'', bool ''coring'' ] ) | ||
| + | }} | ||
| − | + | :{{Par2|startHue|int|0}} | |
| + | :{{Par2|endHue|int|360}} | ||
| + | ::The resulting mask will contain source values in the range [{{FuncArg|startHue}}, {{FuncArg|endHue}}] when {{FuncArg|startHue}}<{{FuncArg|endHue}}. Note that the hue is periodic, thus a hue of 360 degrees corresponds with a hue of zero degrees. | ||
| − | + | ::If {{FuncArg|endHue}}<{{FuncArg|startHue}} then the range [{{FuncArg|endHue}}, 360] and [0, {{FuncArg|startHue}}] will be selected (thus anti-clockwise). If you need to select a range of [350, 370] for example, you need to specify {{FuncArg|startHue}}=370, {{FuncArg|endHue}}=350. | |
| − | + | ::Range 0 to 360 (degrees), default 0, 360; thus when using the default values all pixels will be processed. | |
| − | + | ::As a guide, the following table shows approximate values for the basic colors: | |
| + | ::{| class="wikitable" border="1" style="text-align:center" | ||
| + | !style="width:6em" | Color | ||
| + | !style="width:6em" | startHue | ||
| + | !style="width:6em" | endHue | ||
| + | |- | ||
| + | |style="text-align:left" | Red | ||
| + | |style="background:#D926B9; color: #EEEEEE" | 075 | ||
| + | |style="background:#D93B26; color: #EEEEEE" | 115 | ||
| + | |- | ||
| + | |style="text-align:left" | Yellow | ||
| + | |style="background:#D99D26; color: #121212" | 150 | ||
| + | |style="background:#D5D926; color: #121212" | 172 | ||
| + | |- | ||
| + | |style="text-align:left" | Green | ||
| + | |style="background:#9DD926; color: #121212" | 191 | ||
| + | |style="background:#26D97A; color: #121212" | 258 | ||
| + | |- | ||
| + | |style="text-align:left" | Cyan | ||
| + | |style="background:#26D9B9; color: #EEEEEE" | 279 | ||
| + | |style="background:#26B2D9; color: #EEEEEE" | 300 | ||
| + | |- | ||
| + | |style="text-align:left" | Blue | ||
| + | |style="background:#2688D9; color: #EEEEEE" | 316 | ||
| + | |style="background:#5026D9; color: #EEEEEE" | 004 | ||
| + | |- | ||
| + | |style="text-align:left" | Magenta | ||
| + | |style="background:#9626D9; color: #EEEEEE" | 028 | ||
| + | |style="background:#D526D5; color: #EEEEEE" | 052 | ||
| + | |} | ||
| − | + | :{{Par2|maxSat|int|150}} | |
| − | + | :{{Par2|minSat|int|0}} | |
| + | ::The resulting mask will contain source values in the range [{{FuncArg|minSat}}, {{FuncArg|maxSat}}]. | ||
| − | + | ::Practically the saturation of a pixel will be in the range [0,100] (thus 0-100%), since these correspond to valid RGB pixels (100% corresponds to R=255, G=B=0, which has a saturation of 119). An overshoot (up to 150%) is allowed for non-valid RGB pixels (150% corresponds to U=V=255, which has a saturation of sqrt(127<sup>2</sup>+127<sup>2</sup>) = 180). | |
| − | + | ::Range 0 to 150 (percent), default 150, 0; thus when using the default values all pixels will be processed. | |
| − | {| | + | :{{Par2|coring|bool|true}} |
| − | + | ::When set to true, the luma (Y) is clipped to [16,235]; when set to false, the luma is left untouched. | |
| − | | | + | |
| + | |||
| + | == Examples == | ||
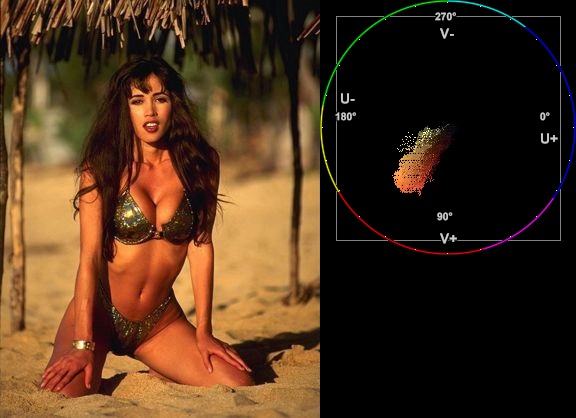
| + | *Suppose we want to create a mask of the skin of the girl below. The proper way to do this is to look at the vectorscope of [[Histogram#Color2_mode|Histogram]]: | ||
| + | :{|border=0 | ||
| + | |<pre style="width:22em"> | ||
| + | clip = ... | ||
| + | Histogram(clip, mode="color2") | ||
| + | </pre> | ||
|- | |- | ||
| − | | | + | |[[File:Tweak_original2_plus_hist.jpg]] |
| − | + | ||
|} | |} | ||
| + | :and estimate the hue range you want to select. As can be seen, the orange hue is between (about) 105 and 165 degrees. | ||
| + | :''Note: axis labels have been added to the vectorscope as a guide – they are not generated by the above script'' | ||
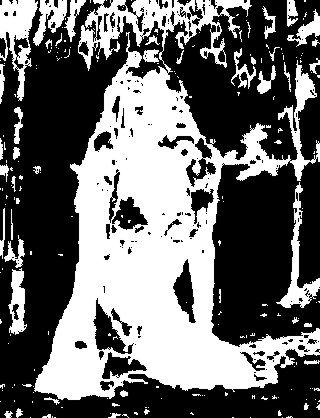
| − | + | :Start with a wide hue range and narrow it until the output of '''MaskHS''' isolates the range of interest. You can also use [[Tweak]] to preview the affected range (with ''sat''=0), as the arguments are compatible. | |
| − | testcard = ColorBars | + | :In our example we arrive at {{FuncArg|startHue}}=105, {{FuncArg|endHue}}=138, and the following mask is obtained: |
| + | :{|border=0 | ||
| + | |<pre style="width:22em" > | ||
| + | clip = ... | ||
| + | MaskHS(startHue=105, endHue=138) | ||
| + | </pre> | ||
| + | |- | ||
| + | |[[File:Maskhs.jpg]] | ||
| + | |} | ||
| + | |||
| + | |||
| + | *Looking at the blue screen example in [[Overlay]] the following can be used | ||
| + | <div {{BoxWidthIndent|56|1}} > | ||
| + | testcard = [[ColorBars]] | ||
# example subtitle file with blue background: | # example subtitle file with blue background: | ||
| − | subs = ImageSource("F:\TestClips\blue.jpg").ConvertToYV24 | + | subs = [[ImageSource]]("F:\TestClips\blue.jpg").[[ConvertToYV24]] |
# subs.Histogram(mode="color2").ConvertToRGB # blue in [345,359] | # subs.Histogram(mode="color2").ConvertToRGB # blue in [345,359] | ||
| − | mask_hs = subs.MaskHS(startHue=340, endHue=359).Levels(0, 1, 255, 255, 0) | + | mask_hs = subs.MaskHS(startHue=340, endHue=359).[[Levels]](0, 1, 255, 255, 0) |
| − | Overlay(testcard, subs, mask=mask_hs, mode="blend", opacity=1) | + | [[Overlay]](testcard, subs, mask=mask_hs, mode="blend", opacity=1) |
| + | </div> | ||
| + | |||
| − | + | == Changelog == | |
{|border=1 cellspacing=1 cellpadding=4 | {|border=1 cellspacing=1 cellpadding=4 | ||
Revision as of 02:59, 29 January 2016
Added in v2.6. Returns a mask (as Y8) of clip using a given hue and saturation range.
Syntax and Parameters
MaskHS(clip [, int startHue, int endHue, int maxSat, int minSat, bool coring ] )
- int startHue = 0
- int endHue = 360
- The resulting mask will contain source values in the range [startHue, endHue] when startHue<endHue. Note that the hue is periodic, thus a hue of 360 degrees corresponds with a hue of zero degrees.
- If endHue<startHue then the range [endHue, 360] and [0, startHue] will be selected (thus anti-clockwise). If you need to select a range of [350, 370] for example, you need to specify startHue=370, endHue=350.
- Range 0 to 360 (degrees), default 0, 360; thus when using the default values all pixels will be processed.
- As a guide, the following table shows approximate values for the basic colors:
Color startHue endHue Red 075 115 Yellow 150 172 Green 191 258 Cyan 279 300 Blue 316 004 Magenta 028 052
- int maxSat = 150
- int minSat = 0
- The resulting mask will contain source values in the range [minSat, maxSat].
- Practically the saturation of a pixel will be in the range [0,100] (thus 0-100%), since these correspond to valid RGB pixels (100% corresponds to R=255, G=B=0, which has a saturation of 119). An overshoot (up to 150%) is allowed for non-valid RGB pixels (150% corresponds to U=V=255, which has a saturation of sqrt(1272+1272) = 180).
- Range 0 to 150 (percent), default 150, 0; thus when using the default values all pixels will be processed.
- bool coring = true
- When set to true, the luma (Y) is clipped to [16,235]; when set to false, the luma is left untouched.
Examples
- Suppose we want to create a mask of the skin of the girl below. The proper way to do this is to look at the vectorscope of Histogram:
clip = ...
Histogram(clip, mode="color2")

- and estimate the hue range you want to select. As can be seen, the orange hue is between (about) 105 and 165 degrees.
- Note: axis labels have been added to the vectorscope as a guide – they are not generated by the above script
- Start with a wide hue range and narrow it until the output of MaskHS isolates the range of interest. You can also use Tweak to preview the affected range (with sat=0), as the arguments are compatible.
- In our example we arrive at startHue=105, endHue=138, and the following mask is obtained:
clip = ...
MaskHS(startHue=105, endHue=138)

- Looking at the blue screen example in Overlay the following can be used
testcard = ColorBars

# example subtitle file with blue background:
subs = ImageSource("F:\TestClips\blue.jpg").ConvertToYV24

# subs.Histogram(mode="color2").ConvertToRGB # blue in [345,359]
mask_hs = subs.MaskHS(startHue=340, endHue=359).Levels(0, 1, 255, 255, 0)

Overlay(testcard, subs, mask=mask_hs, mode="blend", opacity=1)
Changelog
| v2.60 | Initial Release |