Filter SDK/Compiling instructions
Compiling AviSynth Plugins step by step instructions (for MS VC++ 6.0)
Be sure to start with the necessary software.
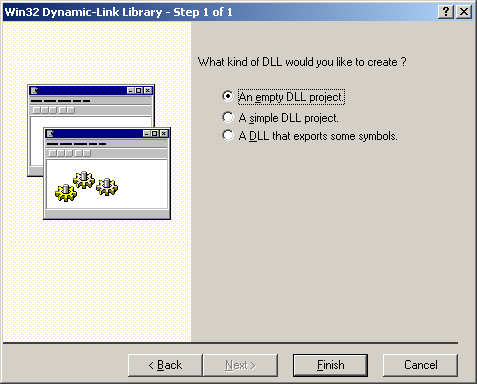
Open VC++. Select a new project: Go to the File tab -> New. Select a Win32 Dynamic-Link Library in the Projects tab:
Add the location of your project and the Project Name. The location is the project folder where the source of your project will be.
Select "An empty DLL project":
Copy existing source files (*.cpp), headers (*.h) and avisynth.h in your project folder. If you started from scratch, you only need to copy avisynth.h in your project folder.
Go to the Project tab -> Add To Project -> Files:
Add the existing source files (*.cpp), headers (*.h) and avisynth.h to your project. If you start from scratch, you need to a new files to your project:
Go to the Project tab -> Add To project -> New:
1) Select C++ source file, and give it a name. 2) Select C/C++ header file (if you are going to use one), and give it a name.
Go to the Build tab -> Set Active Configuration -> select the release build.
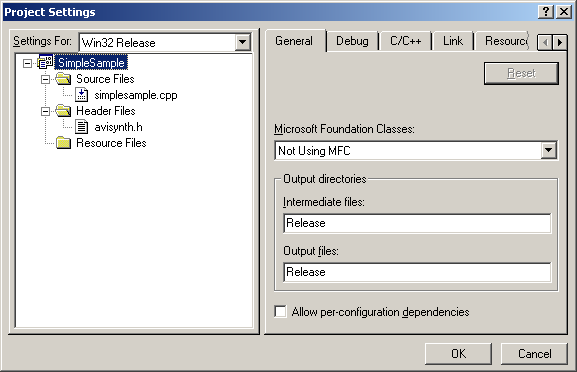
If you go to the Project tab again -> Settings. Then you should see something similar as this:
Save your workspace: File -> Save Workspace.
Finally, code your source/header files, and compile your plugin. Go to the Build tab -> Build (...)
How to debug AviSynth plugins
Two ways are described to debug your plugin. An easy way using DebugView and the use of VC++6's debugger. In both case, the sample code SimpleSample v1.6 is used.
How to debug AviSynth plugins (the short way)
An easy way to debug AviSynth plugin is to use a utility called DebugView for Windows which captures OutputDebugString's output from your code (OutputDebugString sends a string to your debugger). It's a bit limited. So, if this is not sufficient, you should use a debugger as described in the next section.
1) Open Dbgview.exe. Make sure that 'Capture Win32' under the Capture tab is selected.
2) Add the following line at the start of your code:
#include <stdio.h> /* for using sprintf */
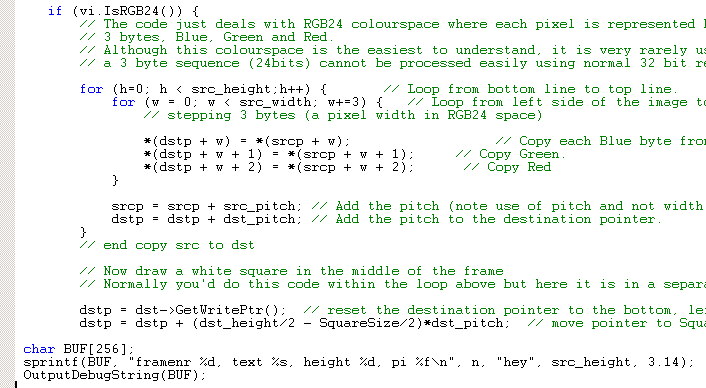
Add, for example, the following lines in your code to check whether certain parameters are passed to the code path which comes after it:
char BUF[256];
sprintf(BUF, "framenr %d, text %s, height %d, pi %f\n", n, "hey", src_height, 3.14);
OutputDebugString(BUF);
Thus:
Nb, %d means integer, %s means string and %f means float/double. \n means add a new line.
3) Compile a release build of your plugin.
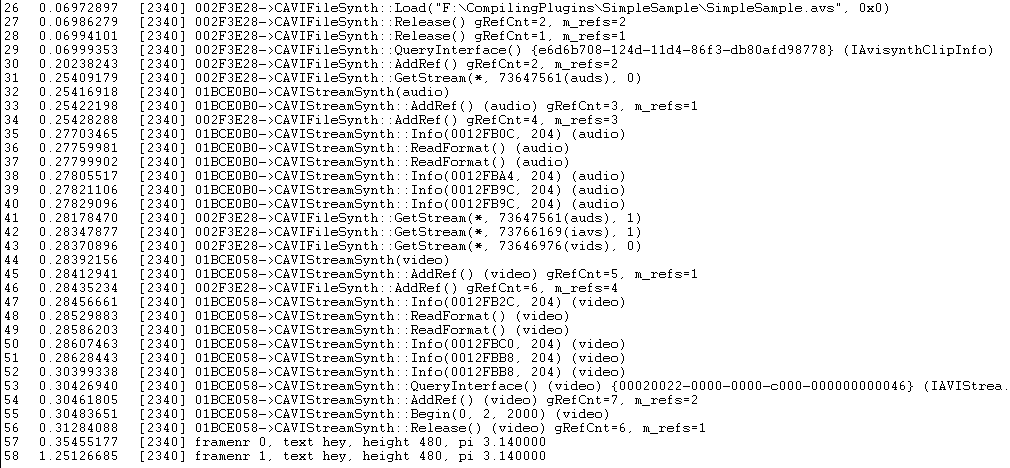
4) Open your script and scroll through it. You will see the following output in DebugView:
In the example the script is loaded in line 26. After that some AviSynth output is captured. In the lines 57 and 58 the output of OutputDebugString is written.
If your script crashes somewhere, you should put these lines just before the crash (it may take a few attempts to find that point). Then you should pass the values of the relevant parameters and check whether they are correct. Apparently there is some parameter whose value is empty or invalid.
How to debug Avisynth plugins (for MS VC++ 6.0)
These are the steps to debug an AviSynth plugin in VC++ 6:
1. Go to the build tab and set the Active configuration to the Debug version of your plugin.
2. Build the debug version of your plugin. Thus go to the build tab and Build (...).
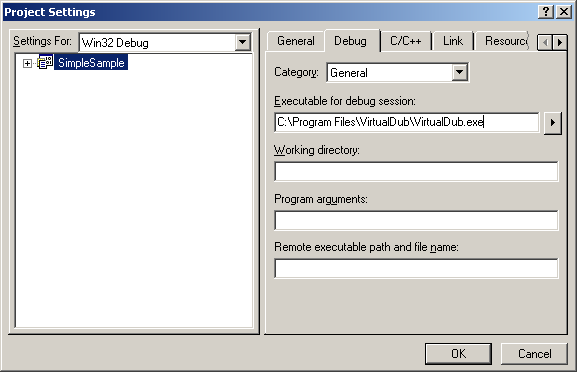
3. We will use VirtualDub.exe to debug your plugin. Go to Project tab, then select Settings -> Debug -> General -> Executable for debug session -> browse to a version of VirtualDub.exe and specify that:
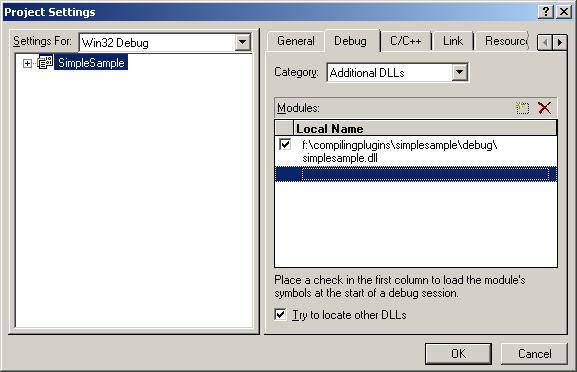
4. Go to Project tab, then select Settings -> Debug -> Additional DLLs, and browse to the filter DLL in the Debug directory:
5. Make an AviSynth script that loads and uses your filter. Make sure to load the Debug version of your plugin! Thus for example:
LoadPlugin("F:\CompilingPlugins\SimpleSample\Debug\simplesample.dll")

Colorbars().Trim(0,1)
ConvertTORGB24()
SimpleSample(100)
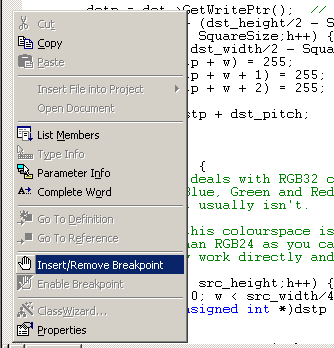
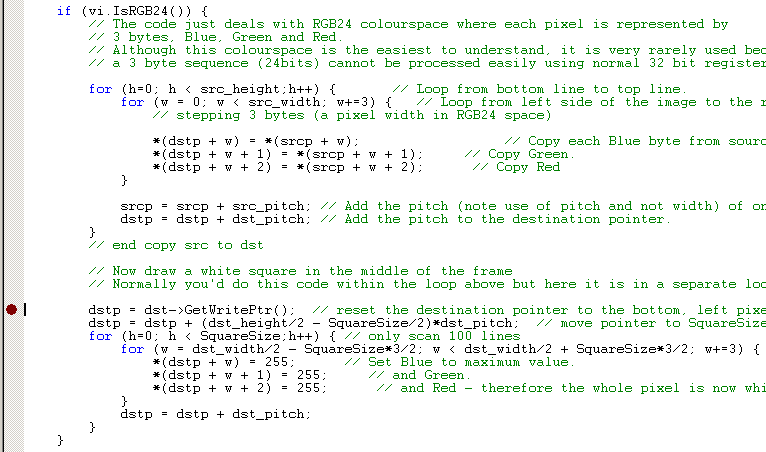
6. Set breakpoints as required. You can do this by clicking with the right mouse button next to a statement in your code (in the grey section). For example:
Select the option: Insert/Remove Breakpoint:
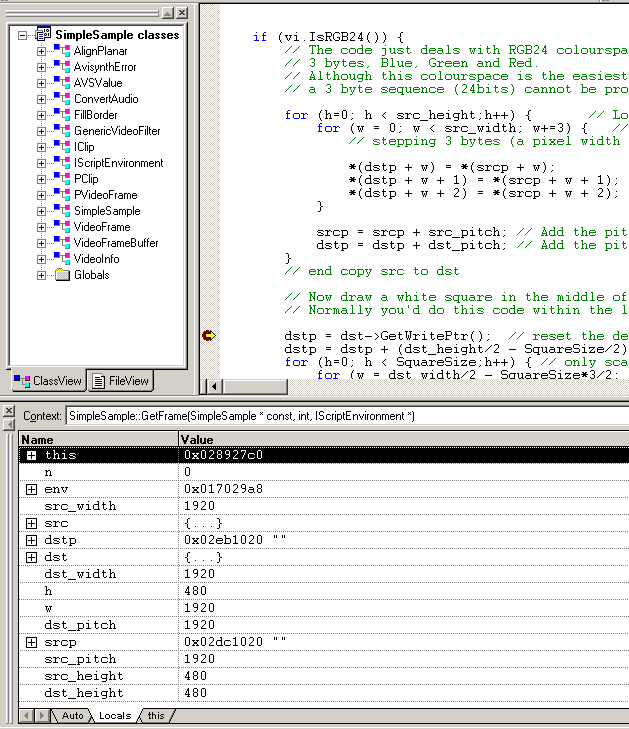
7. Go to the Build tab, and select Start Debug -> Go (or the shortcut F5). VirtualDub will execute. Open the AviSynth script in that VirtualDub instance. The code will execute up to your first breakpoint (at least if it follows that code path):
You will see a yellow arrow through your breakpoint.
Above I also opened the 'variables output window'. It is under the View tab -> Debug Windows -> Variables. You can view the value of the variables when stepping through your code. Use Debug -> Step Into (or the shortcut F11) to step through your code. Use Debug -> Step Over (or the shortcut F10) to step over function calls.
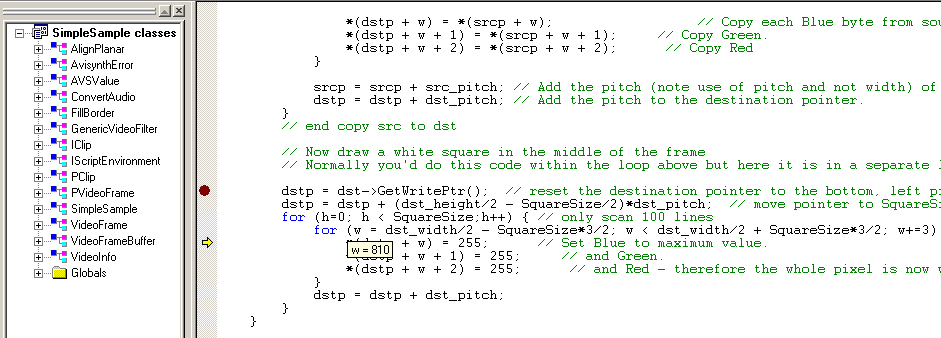
When moving your mouse over a variable, you can also see the value of it:
If you want to set a breakpoint somewhere else, just remove the existing one (by right clicking on it). Put a new one somewhere and press F5.
If you want to stop debugging, go to the Debug tab -> Stop Debugging.
Debug info from MAP file
IanB wrote: Recent versions of Avisynth now ship with an avisynth.map! You can use this accurately get routine addresses. Avisynth preferably loads at 0x10000000, use the debugger loaded module display to check this.
Build your plugin in debug mode. If you can, build yourself a Debug or Relsym avisynth.dll and debug it, if not the use the .map file provided to interprete the Call stack addresses.
Compiling AviSynth Plugins step by step instructions (for MS VC++ 2005 Express Edition)
Setup VC++ 2005 Express Edition environment
- Install MS VC++ 2005 Express Edition.
http://www.microsoft.com/express/2005/ It is web-based install, but you need to register (which you can do freely).
I prefer manual installation with full CD image download. It may be used on computer without Internet access. http://go.microsoft.com/fwlink/?linkid=57034 (Note: link updated Dec/10)
Run it at least once before installing the SDK
- Install Microsoft Platform SDK
Last version is at http://www.microsoft.com/downloads/details.aspx?FamilyId=0BAF2B35-C656-4969-ACE8-E4C0C0716ADB
Previous versions works fine too (and older February 2003).
http://www.microsoft.com/msdownload/platformsdk/sdkupdate/
http://www.microsoft.com/msdownload/platformsdk/sdkupdate/psdk-full.htm
It seems, you need install Core component only with Web install, but you may prefer full or ISO download for offline computer.
- Update the Visual C++ directories in the Projects and Solutions section in the Options dialog box.
Add the paths to the appropriate subsection (change 'Microsoft Platform SDK for Windows Server 2003 R2' in following strings by your real path of installed version of Microsoft SDK):
Add to Executable files: C:\Program Files\Microsoft Platform SDK for Windows Server 2003 R2\Bin
Add to Include files: C:\Program Files\Microsoft Platform SDK for Windows Server 2003 R2\Include
Add to Library files: C:\Program Files\Microsoft Platform SDK for Windows Server 2003 R2\Lib
See http://msdn.microsoft.com/vstudio/express/visualc/usingpsdk/
- Update the corewin_express.vsprops file.
To make the Win32 template work in Visual C++ Express you need to edit the corewin_express.vsprops file (found in C:\Program Files\Microsoft Visual Studio 8\VC\VCProjectDefaults) and change the string that reads:
AdditionalDependencies="kernel32.lib" to
AdditionalDependencies="kernel32.lib user32.lib gdi32.lib winspool.lib comdlg32.lib advapi32.lib shell32.lib ole32.lib oleaut32.lib uuid.lib"
This step is usually not needed for most AviSynth plugins (kernel.lib is enough), but sometimes you may need in some other library, in particular User.Lib for debug.
- Enable Win32 Windows Application type in the Win32 Application Wizard.
To enable that type, you need to edit the file AppSettings.htm file located in the folder “%ProgramFiles%\Microsoft Visual Studio 8\VC\VCWizards\AppWiz\Generic\Application\html\1033\".
In a text editor comment out lines 441 - 444 by putting a // in front of them as shown here:
// WIN_APP.disabled = true;
// WIN_APP_LABEL.disabled = true;
// DLL_APP.disabled = true;
// DLL_APP_LABEL.disabled = true;
Save and close the file and open Visual C++ Express.
This step is optional if you have project file for plugin (new or old C++ version) and do not create new plugin from scratch.
How to compile existant (old MS VC 6.0) plugin with MS VC++ 2005
- Start VC++ 2005, go to folder with old plugin (e.g. SimpleSample) unpacked zip file with full source codes and project files, and open plugin workspace file SimpleSample.dsw.
- Agree in dialog to convert and open this project.
- Go to menu Build -> Configuration Manager, Set active solution configuration to Release (or Debug if you want firsly debug it).
- Go to Build -> Build Solution (F7) to compile and create SimpleSample.dll
- If you get fatal error LNK1181: cannot open input file 'odbc32.lib', then go to menu Project -> SimpleSample Properties. Select Configuration Properties -> Linker -> Input -> Additional Dependencies, and remove extra unneeded libraries like odbc32.lib, odbccp32.lib.
- Also check Linker -> Output File option there and set approriate pathname (or Inherit From Process default).
- You can make some changes (edit) of source codes if you want.
- Repeat command Build -> Build Solution (F7) to compile and create SimpleSample.dll
How to create new plugin from scratch with MS VC++ 2005
- Start VC++2005.
- Menu: fiIe -> Create new project.
- Select Win32 console appication.
- Enter name of your new project and press OK.
- You will in Win32 Appcilation Wizard. Press Application Settings (left panel).
- Select Application Type as DLL (but it may be console too).
- At Additional options select "Empty project"
- Copy files to project folder with Explorer.
- Add header file avisynth.h to the project: Menu Project -> Add existent item. Also add existant (e.g. simplesample.cpp) or create new CPP files by Project -> Add new item.
- Go to menu Build -> Configuration Manager, Set active solution configuration to Release (or Debug if you want firsly debug it).
- Make some changes (edit) of source codes to implement your algorithm. See SimpleSample or some other open source plugin source code and Avisynth Filter SDK for details.
- Go to Build -> Build Solution (F7) to compile and create plugin SimpleSample.dll
Compiling AviSynth Plugins step by step instructions (for MS VC++ 2008 Professional Edition)
- In this guide, we will compile the Example plugin from CPP for C programmers, from http://forum.doom9.org/showthread.php?p=1538557#post1538557 or directly from http://www.mediafire.com/download.php?tc61m9otustmy29
- Start Microsoft Visual Studio 2008
- Upon first start, you are asked to set up your environment. You may choose the typical Visual C++ option
- Choose File->New->Project or click the New Project icon
- On the left pane, under Project Types, expand Visual C++ and select Win32
- On the right pane, choose Win32 Console Application
- Enter a name for your project (in this example we will use Example), click OK
- You may get an error: An error has occurred in this dialog, Error: 54, Unspecified Error. This may be because you installed some windows updates but didn't reboot yet. Click OK.
- You are shown the current project settings. Click Next.
- Under Application Type, click the DLL option. Under Additional options, check the Empty project box.
- A new directory is created, My Documents\Visual Studio 2008\Projects\Example
- You need to extract the files from our example plugin into My Documents\Visual Studio 2008\Projects\Example\Example
- In the default layout, there is a Solution Explorer pane on the left side. Right click Header Files, and select Add->Existing Item, select avisynth.h and click Add
- Continue to add the other files, Info.h and InfoF.h
- Right click Source Files, select Add->Existing Item, and select Example.cpp
- Click Build->Build Solution (this will give errors!)
- There's a lot of errors about OutputDebugStringW. To fix this, select Project->Example Properties
- In the left pane, Expand Configuration Properties, select General
- In the right pane, click Character Set. Use the drop-down to select Use Multi-Byte Character Set. Click OK.
- Click Build->Build Solution (this may give errors!)
- In the version 0.3 of the plugin, there was an error, 'example.cpp(610) : error C4430: missing type specifier - int assumed'. To fix this, double-click that error line to highlight it's location in the example.cpp source file. Change 'const wstep = (vi.IsRGB24()) ? 3 : 4; // 3 bytes for RGB24, & 4 for RGB32.' to 'const int wstep = (vi.IsRGB24()) ? 3 : 4; // 3 bytes for RGB24, & 4 for RGB32.'
- Click Build->Build Solution
- If you get an error 'unresolved external symbol _main referenced in function ___tmainCRTStartup', then you're trying to build an .exe. Use Project->Example Properties, Configuration Properties, General, set Configuration Type to Dynamic Library (.dll)
- By default, a debug version is made. To change this, Build->Configuration Manager, select Release in the left drop-down
- You will have to re-apply the configuration changes: Project->Example Properties, Configuration Properties, General, Configuration Type=Dynamic Library (.dll) and Character Set=Use Multi-Byte Character Set
- The following file should appear: My Documents\Visual Studio 2008\Projects\Example\Release\Example.dll. Note that there is also a directory My Documents\Visual Studio 2008\Projects\Example\Example\Release which contains only tempory files, but not the dll. This is set under Project->Example Properties, General, Output Directory=$(SolutionDir)$(ConfigurationName), Intermediate Directory=$(ConfigurationName). In this case $(SolutionDir)=My Documents\Visual Studio 2008\Projects\Example, $(ConfigurationName)=Release.
- You need to copy Example.dll to your Avisynth plugins directory, and then test it with the Example.avs file.
- If everything worked, you can proceed to modify the example by following the comments, or also using the SimnpleSample included in the Avisynth distribution.

